
Upload Spreadsheet
Upload a spreadsheet in the format you already have — a supplier disclosure form, a bill of materials, a product export from your ERP or PLM — and Altana reads the file, proposes how it should be modeled, asks you a few questions, and creates draft entities for you to review. You do not reformat the file into the Supply Chain Data Template first, and nothing joins your catalog until you save the drafts you want.
Early access. These screens will keep changing while we work with early users. If a file does not come through the way you expected, tell your Altana account team.
Use this path when your file is in someone else's layout — a supplier's own disclosure form, several tiers in one sheet, stacked header rows. If your data is already in the Supply Chain Data Template, use Uploading Products via CSV instead: it is a shorter path with no review steps. A file that arrives in the same non-template layout every month still belongs here — that repetition is exactly what a File Type learns from, so the second and later uploads ask less of you.
What you need before you start
- A CSV, XLS, or XLSX file. Workbooks with several sheets are supported. PDFs, scans, and photos go through Upload Documents in the same menu.
- The catalog you want the records in. The catalog you are working in is the destination.
- A rough idea of which sheet holds the data and how the supply chain in it flows. You confirm both during the review steps, so an approximate answer is enough to start.
1. Open your catalog and choose Upload Spreadsheet
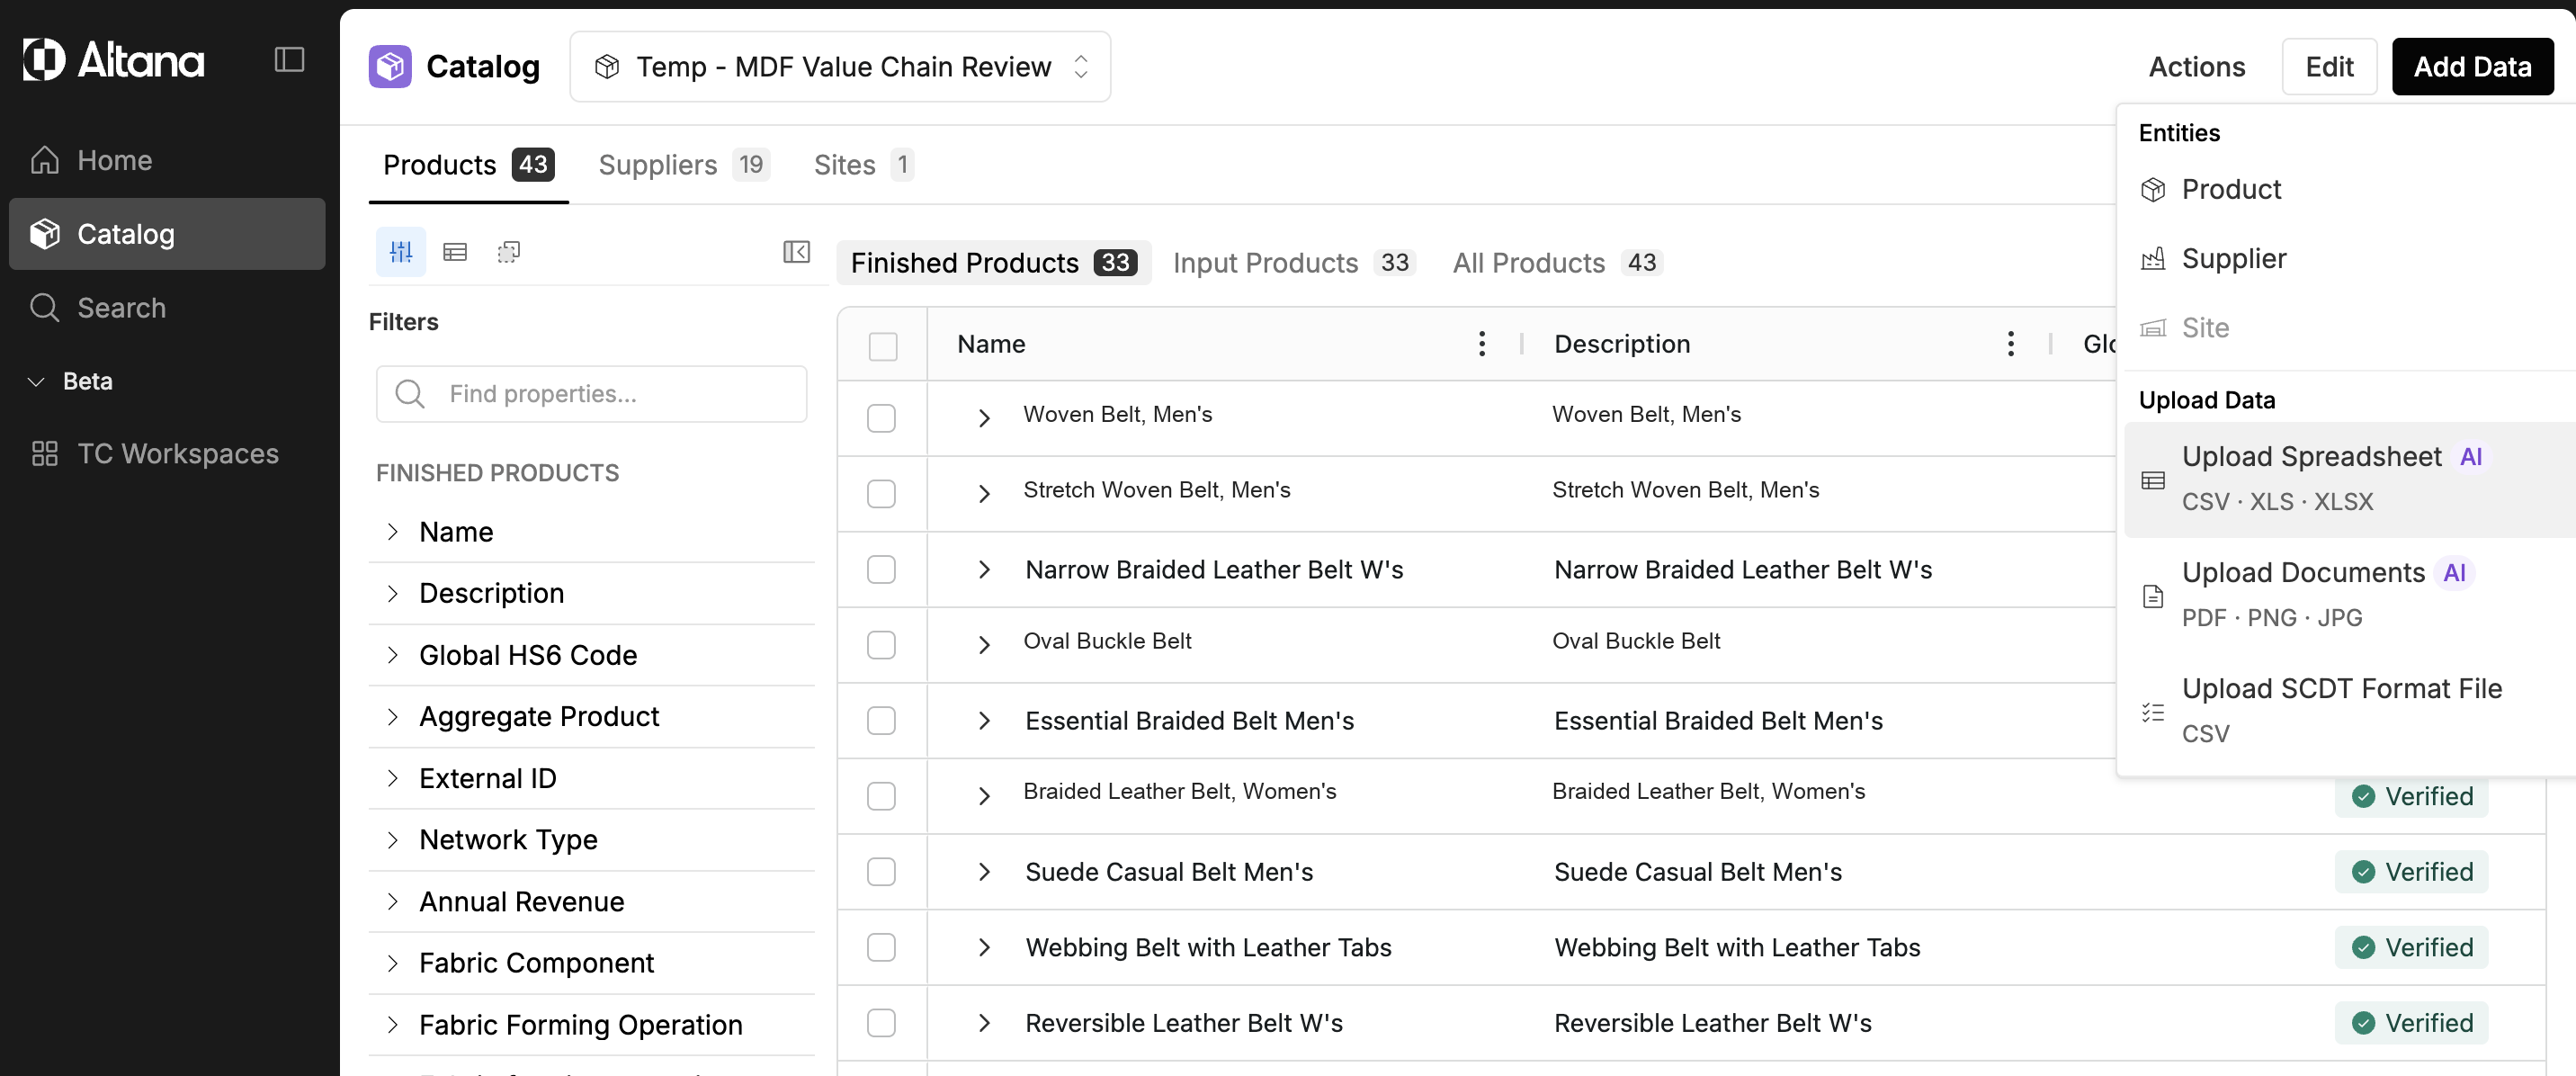
Select Catalog in the left navigation, then Add Data in the header. Under Upload Data the menu offers three routes, each labelled with the formats it takes:
- Upload Spreadsheet (CSV · XLS · XLSX), marked AI — the path this guide covers. Choose it.
- Upload Documents (PDF · PNG · JPG), also marked AI — for traceability packets, certificates, and scans. Same idea, different reader.
- Upload SCDT Format File (CSV) — the direct template path, with no review steps. See Uploading Products via CSV.
2. Meet the upload screen
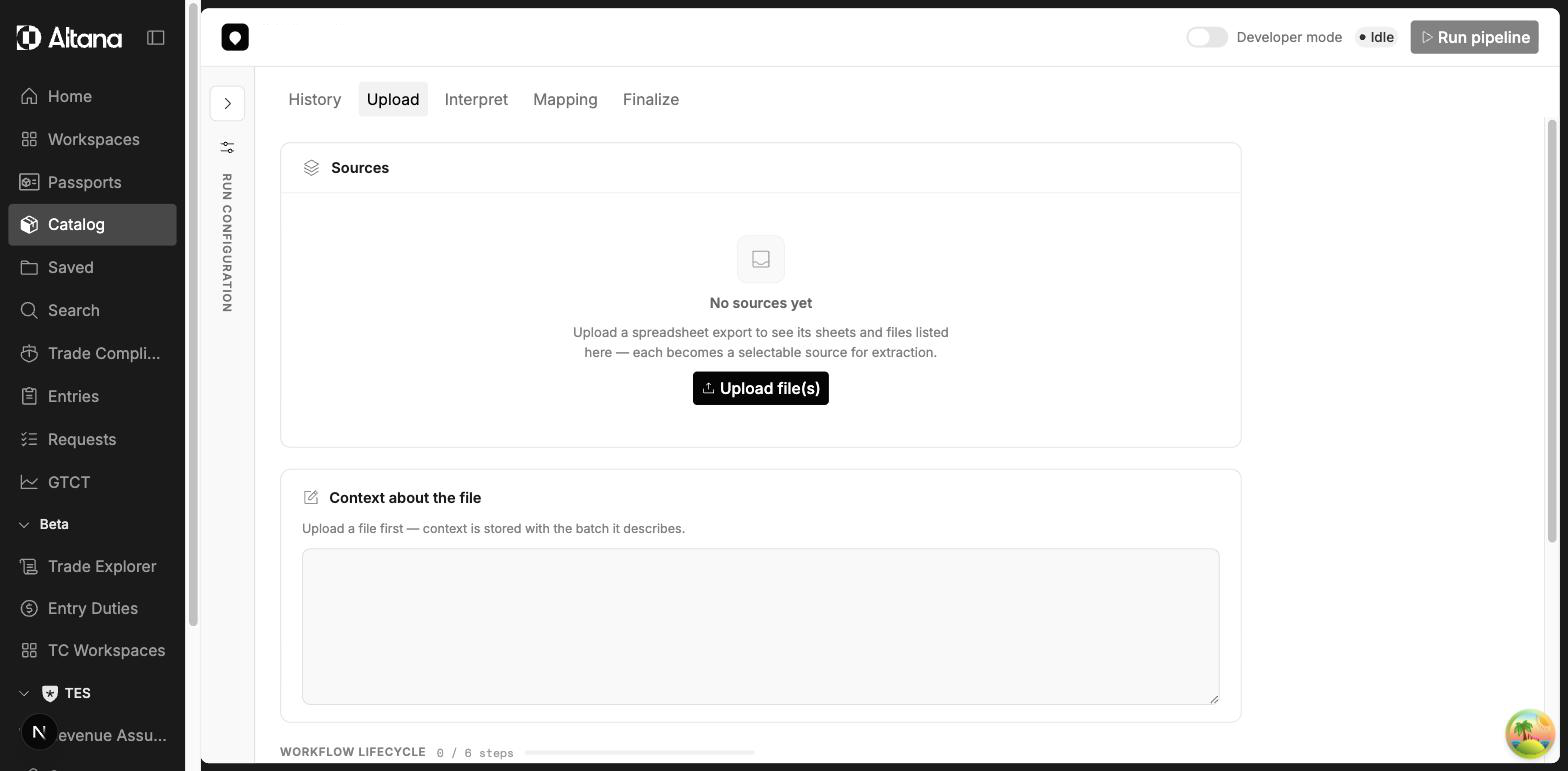
The screen that opens is where the whole import happens. Its tabs — History, Upload, Interpret, Mapping, and Finalize — light up as your file moves through the pipeline. You start on Upload. History lists your earlier uploads in this catalog, so you can reopen one and see what it produced.
3. Upload your file
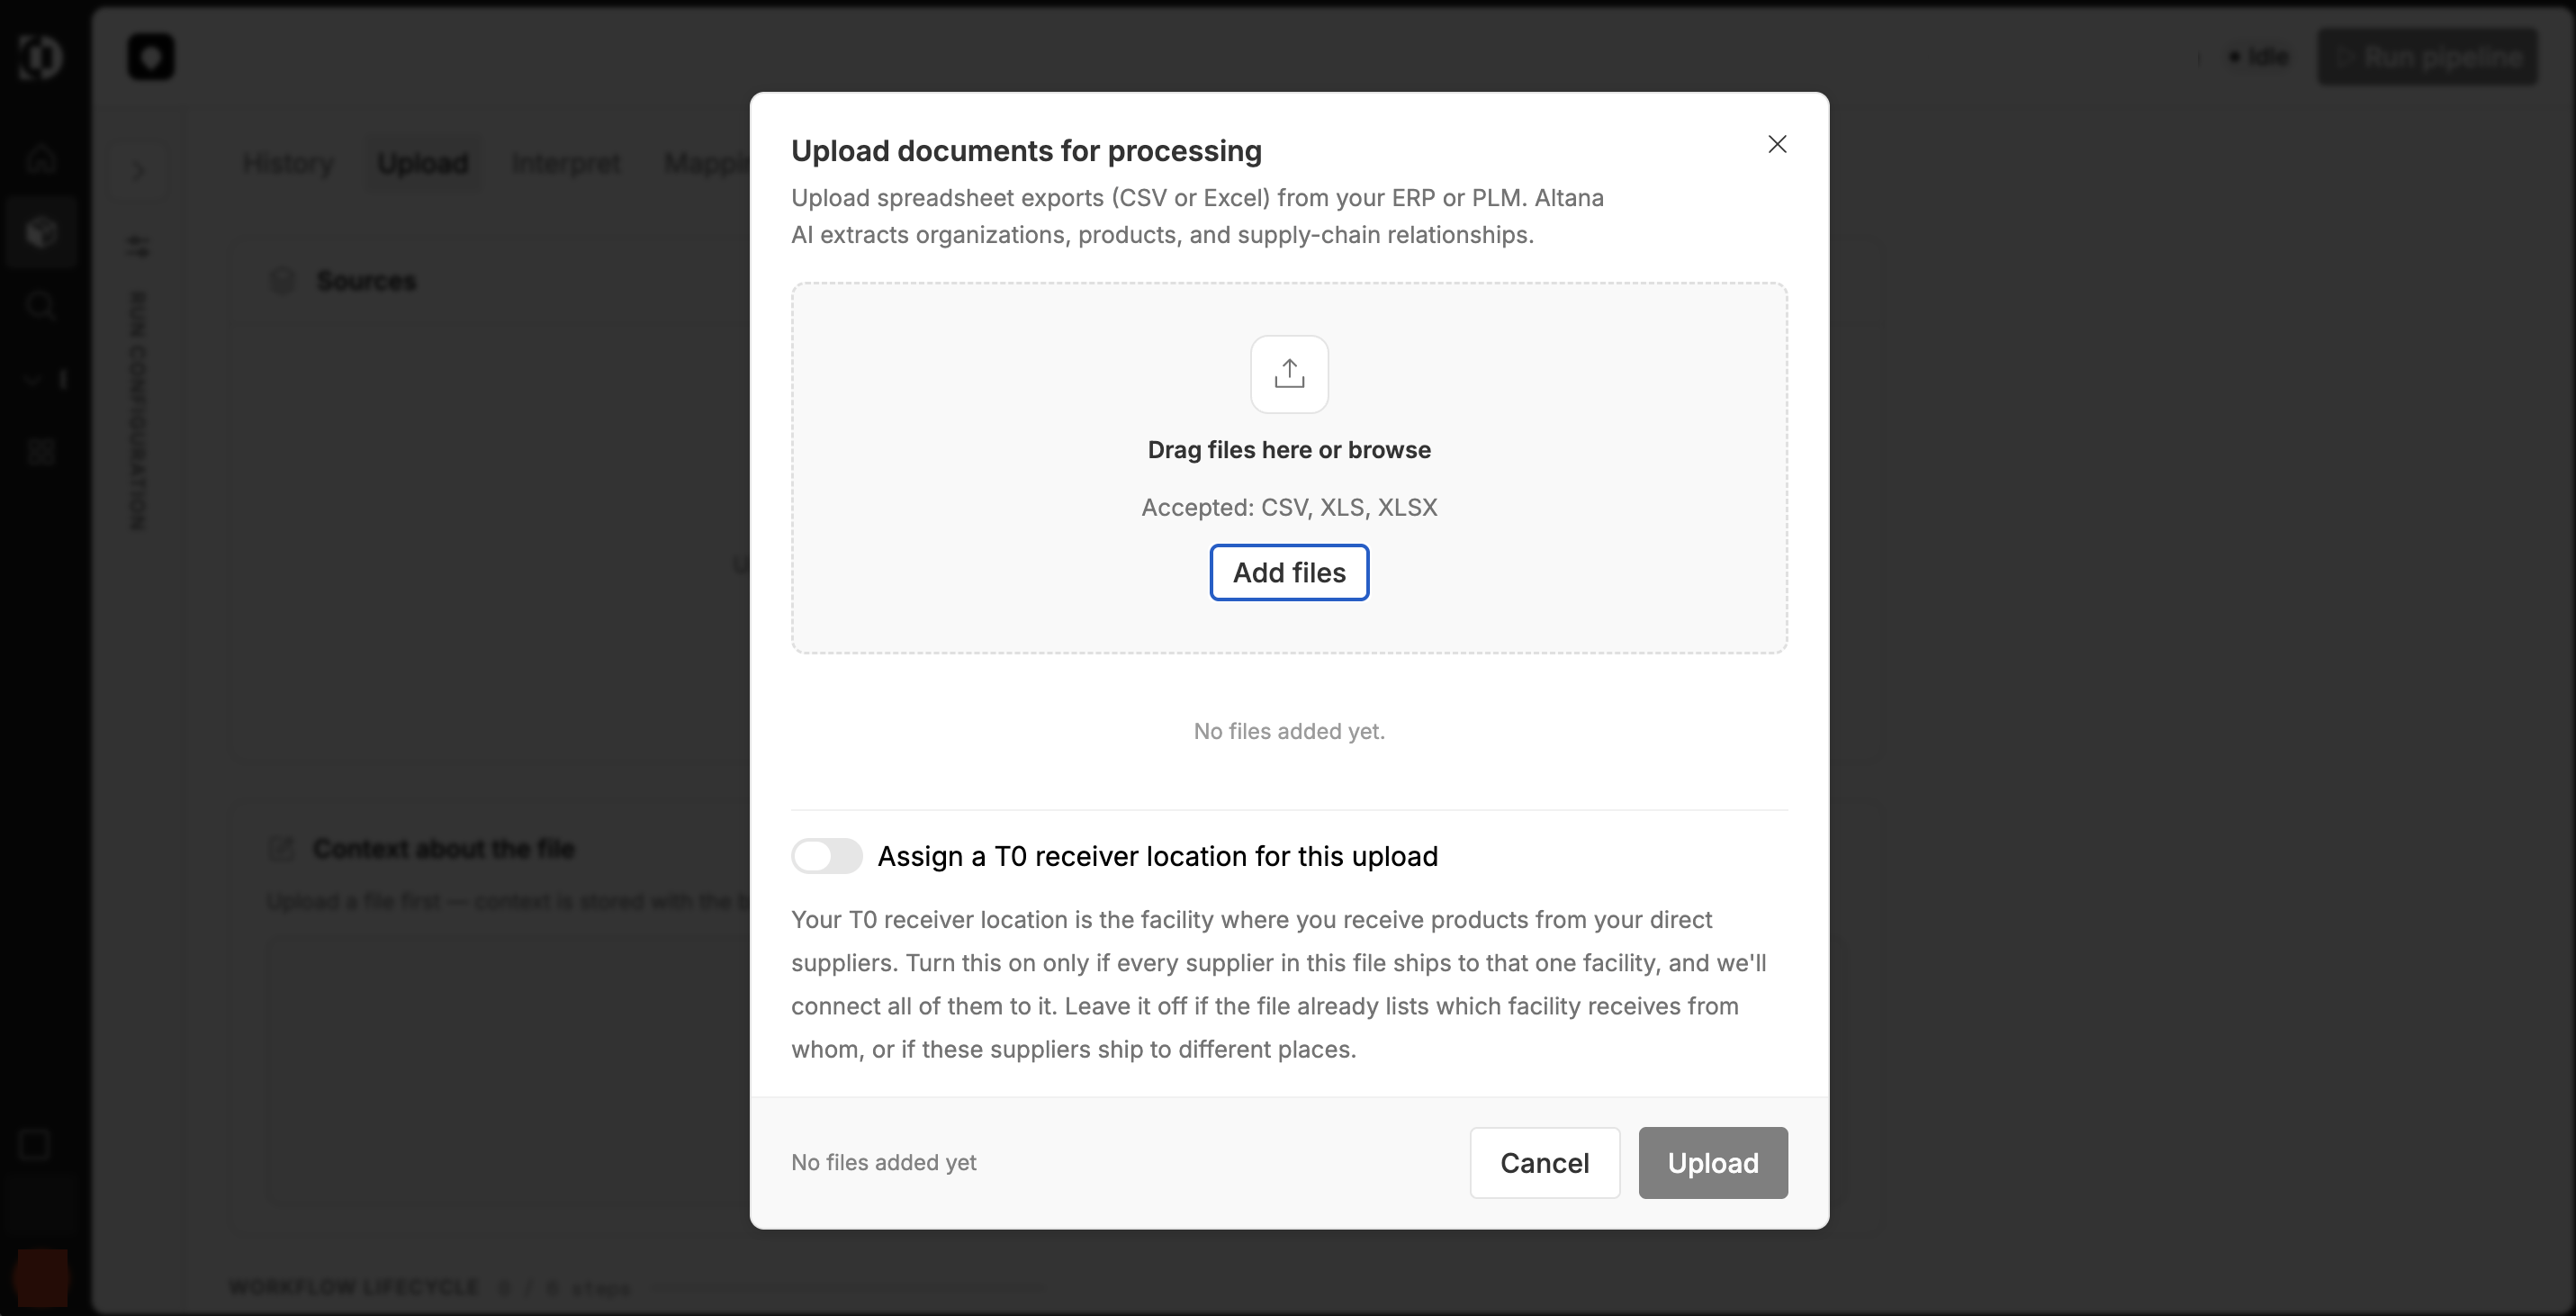
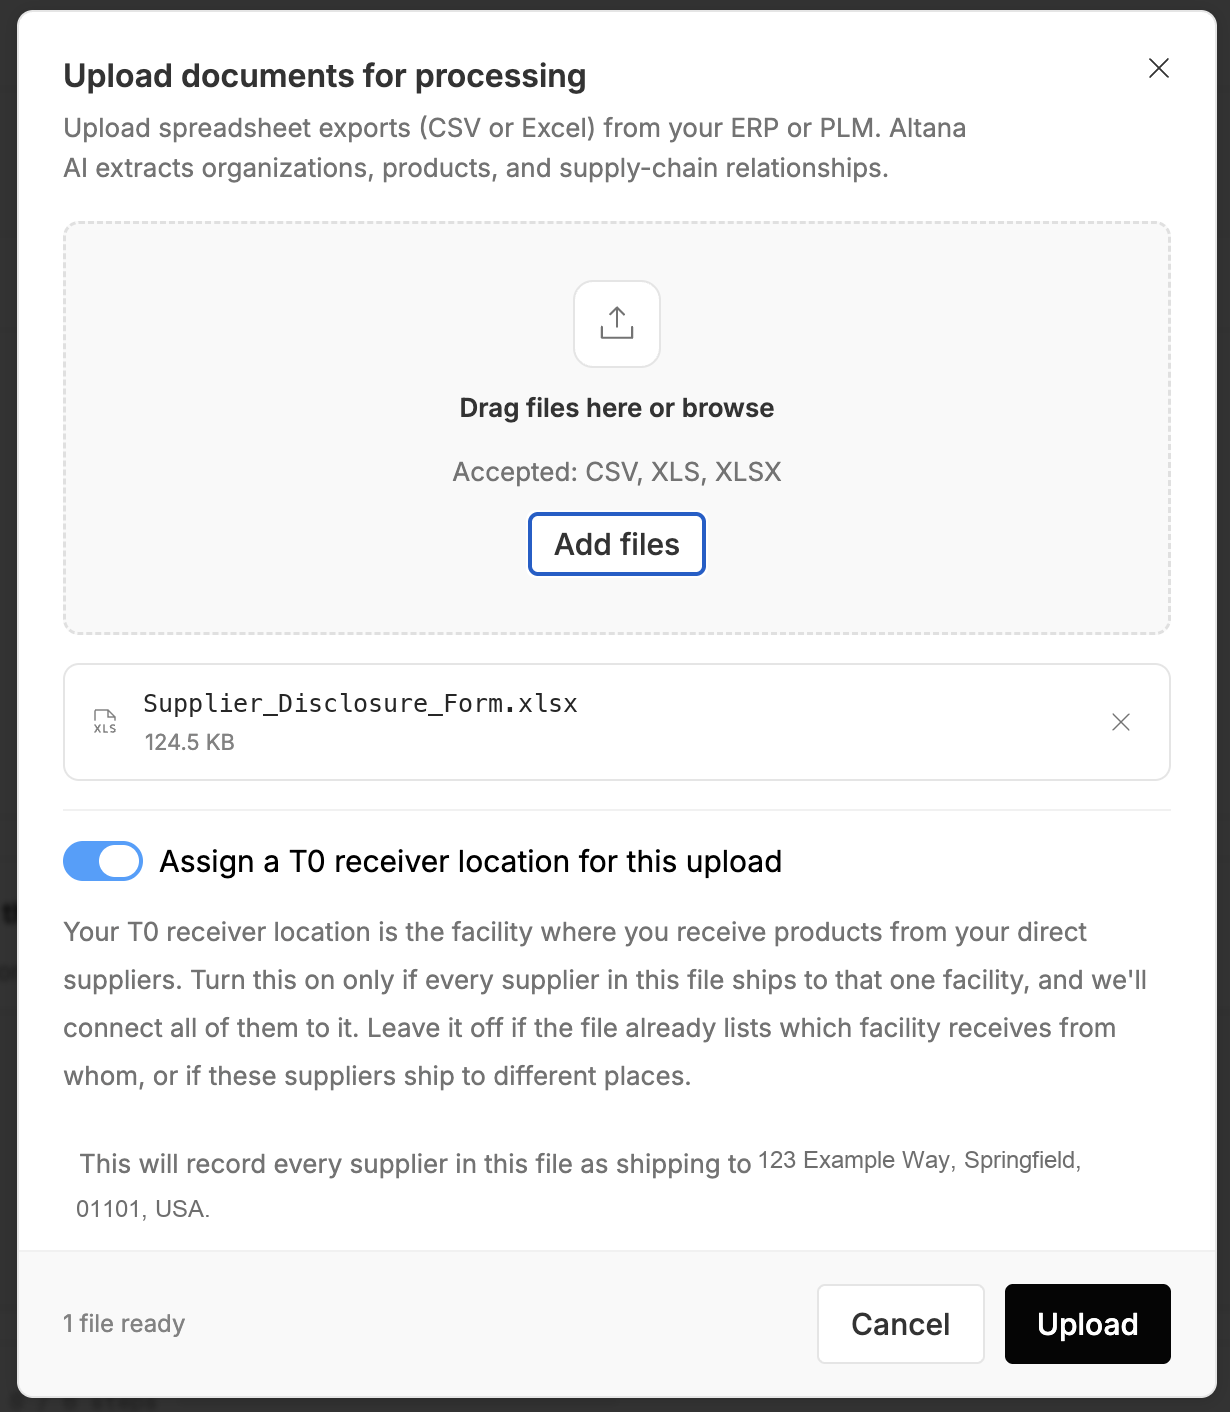
On the Upload tab, select Upload file(s) to open the upload dialog, then Add files and choose a spreadsheet from your computer. The file appears in the dialog with its size once it is ready. You can add several files at once, and add more to the same batch later — useful when a set of disclosure forms arrives over a few days and belongs together.
4. Optional — assign a T0 receiver location
Some files describe only the supplier side of a supply chain — factories and the materials they make — without naming your own organization or the site that receives the goods. When that is the case, turn on Assign a T0 receiver location for this upload and choose the facility under T0 receiver location. Your T0 receiver location is the facility where you receive products from your direct suppliers; Altana connects every supplier in the file to it, so the imported data attaches to your organization instead of standing on its own. Before you upload, the dialog states plainly which address it is about to record.
Leave the switch off if the file already says which facility receives from whom, or if the suppliers in it ship to different places — it applies one receiver to the whole file, so a mixed file needs it off.
The receiver is set when the batch is first uploaded and then stays fixed for every file in that batch. To use a different receiver, start a new batch.
5. Let Altana recognize the file, and check the context it fills in
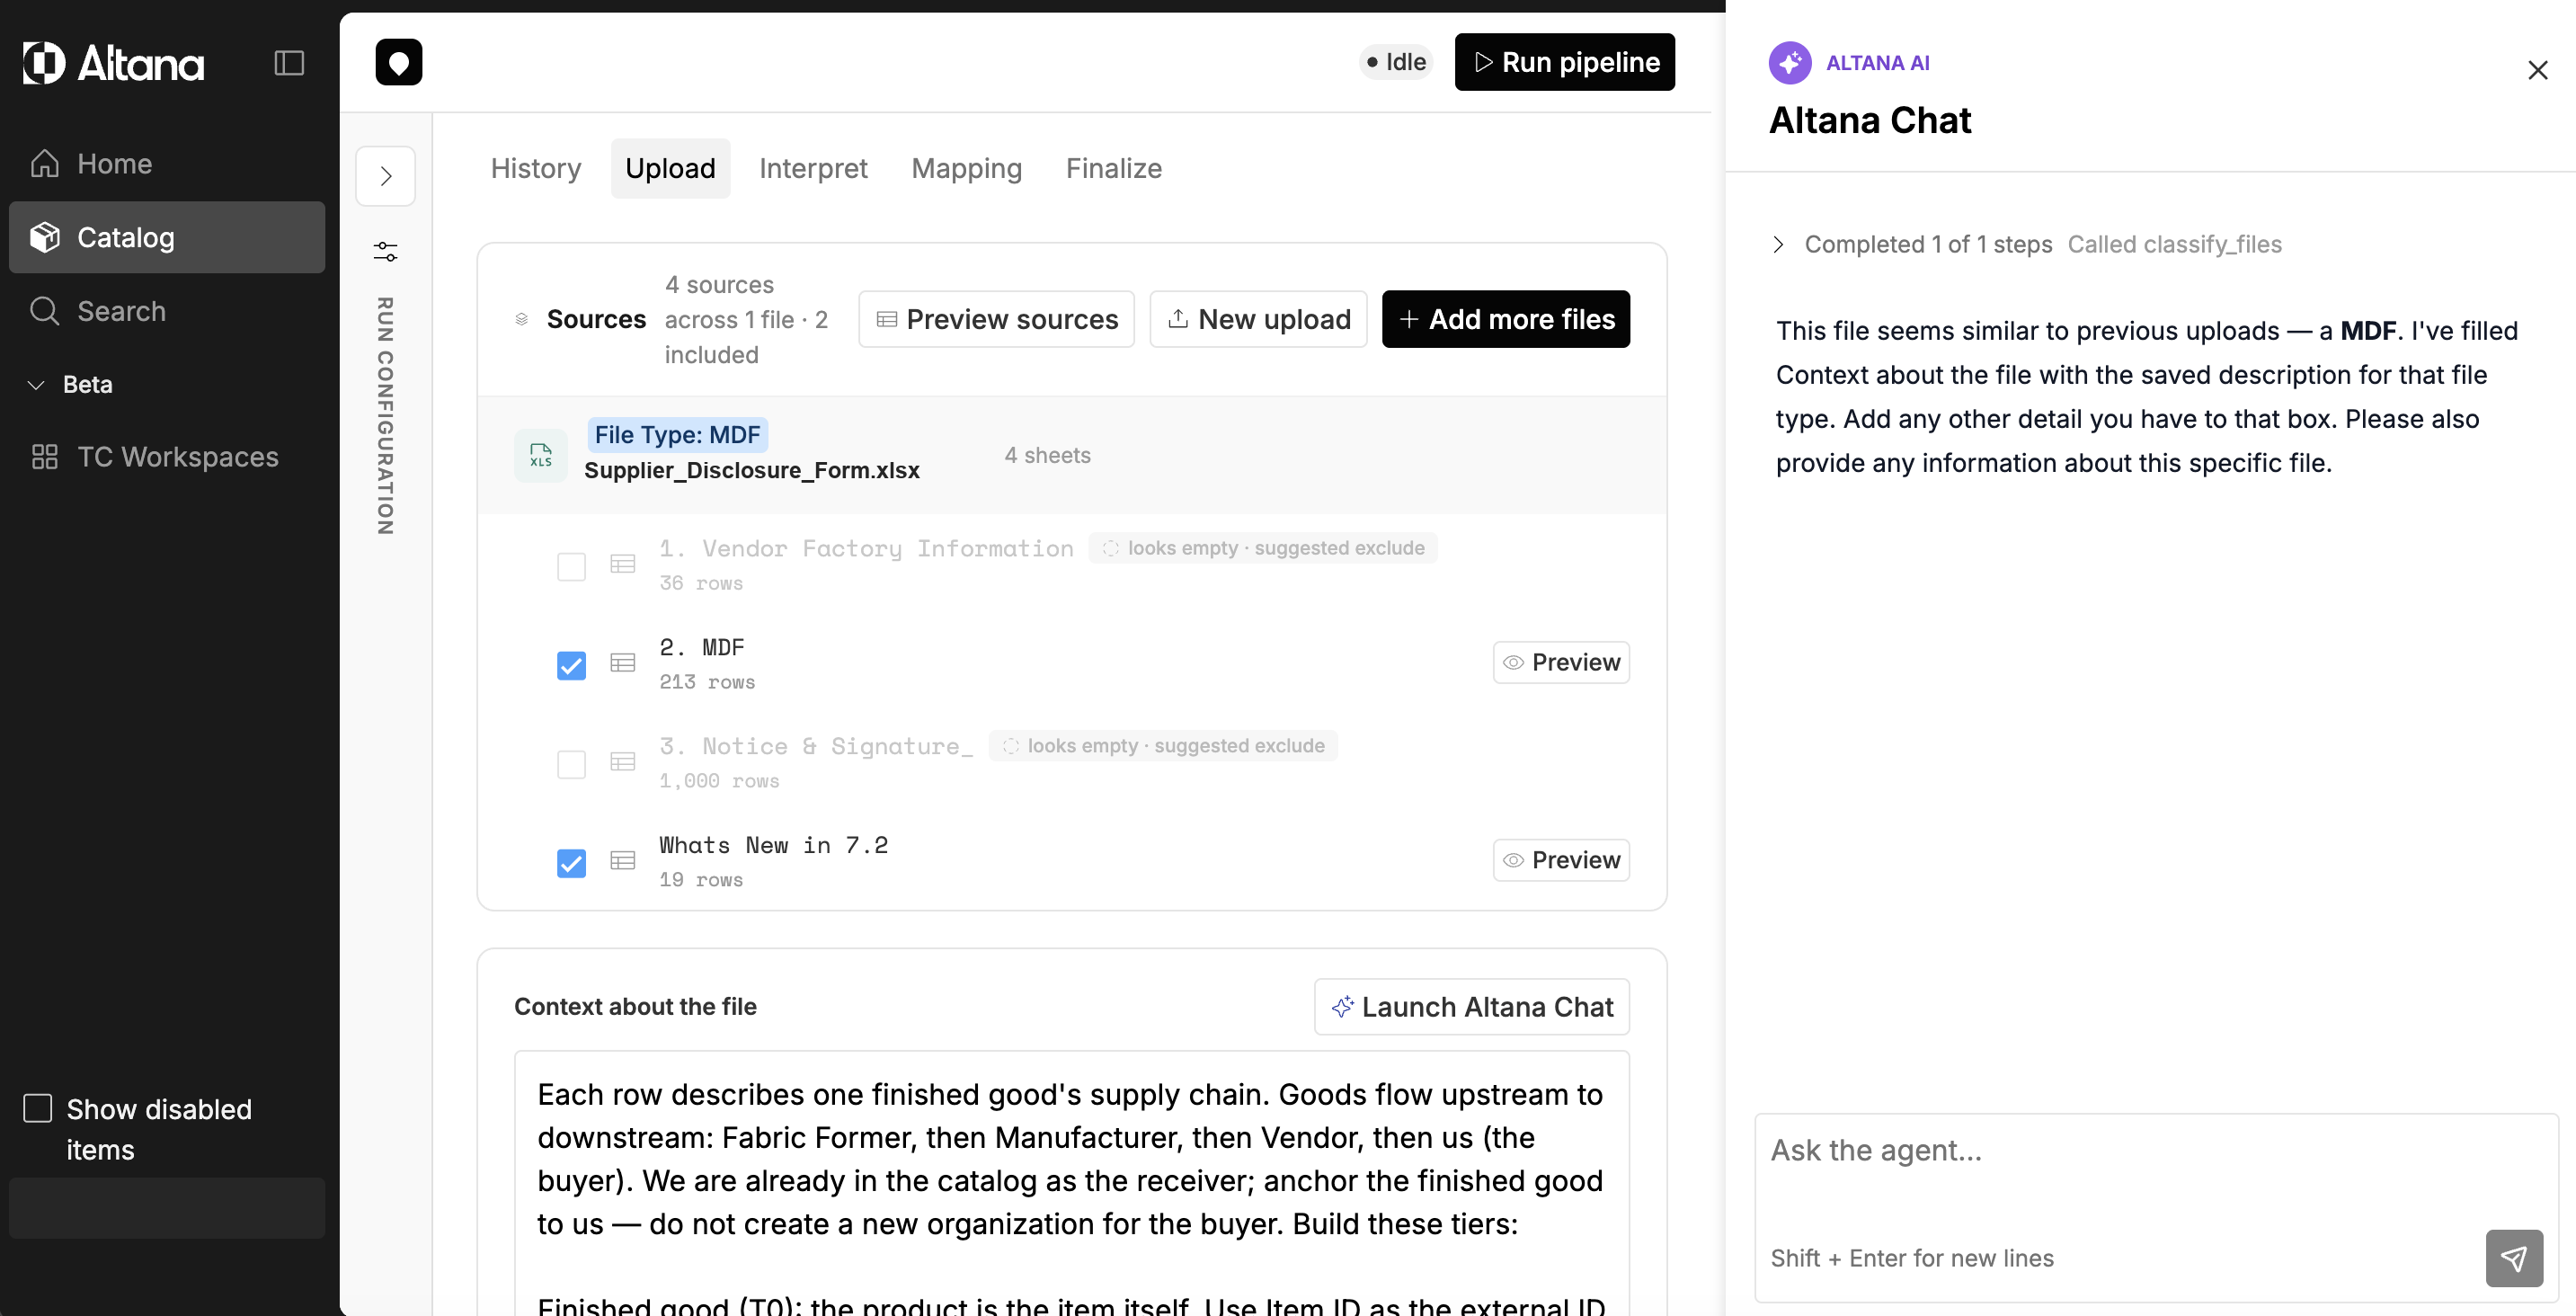
When you upload a single file, Altana Chat opens beside the the upload screen and reads it. One of two things happens:
- It recognizes the format. If the file looks like a File Type you have uploaded before, Altana fills the context box with the guidance saved against that File Type — the notes you or a colleague wrote the last time a file of this shape came through. Read it and correct anything that does not apply to this particular file.
- It is a new format. Altana drafts a description of the file from what it can see — which tab holds the data, what a row represents — and fills that in instead. Edit it the same way.
Either way the text is a starting point you own, not a decision. You can rewrite it completely, and you can reopen the conversation at any time with Launch Altana Chat in the context box header. Altana Chat reads one file at a time, so a batch with several files in it does not open the chat — write that batch's context yourself.
Once a file is recognized, the Upload tab shows a badge reading File Type: name · current mapping vn. See How File Types remember a format for what that carries.
6. Review the detected sheets and finish the context
The Sources panel lists every sheet in your workbook with its row count, each included by default. Untick any sheet that is instructions, a change log, or a signature page so the extractor ignores it. A sheet Altana reads as blank is marked looks empty · suggested exclude, which is usually right but worth a glance before you accept it. Preview sources shows the rows it can read through each sheet's header rows.
Then finish the Context about the file box. Reusable notes about the format and one-off notes about this particular file can share the same box. A few plain-language sentences — which tab to read, what identifies a product, how the tiers relate, what to ignore — measurably improve the result. The box saves as you type, showing Saved when it lands. Write it before you run the pipeline: once interpretation starts the note is locked (Locked — this batch has already been sent for interpretation) so the extractor and your guidance cannot drift apart.
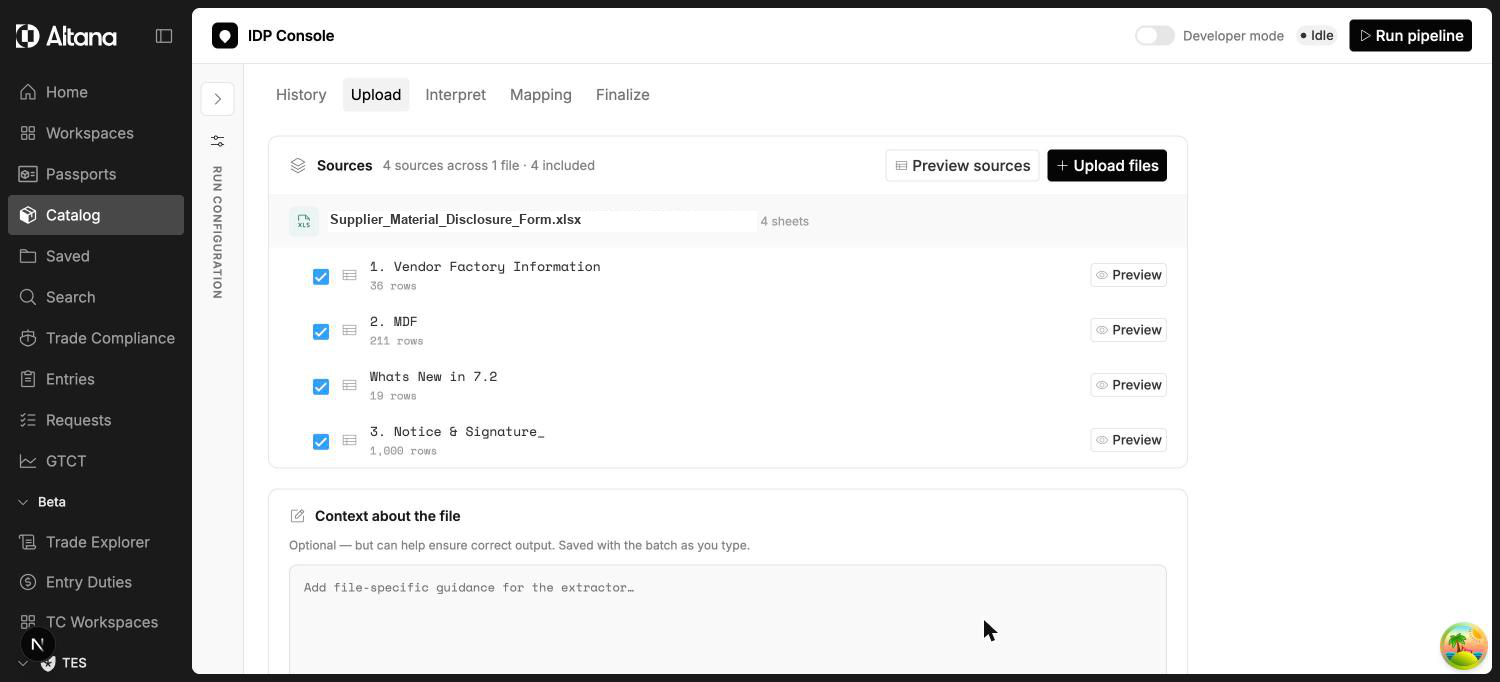
Tip. Be specific in the context box. Naming the exact tab to extract from, what makes a finished product, and which columns to ignore (for example template or header rows) helps Altana model your data correctly on the first pass.
7. Run the pipeline and read the interpretation
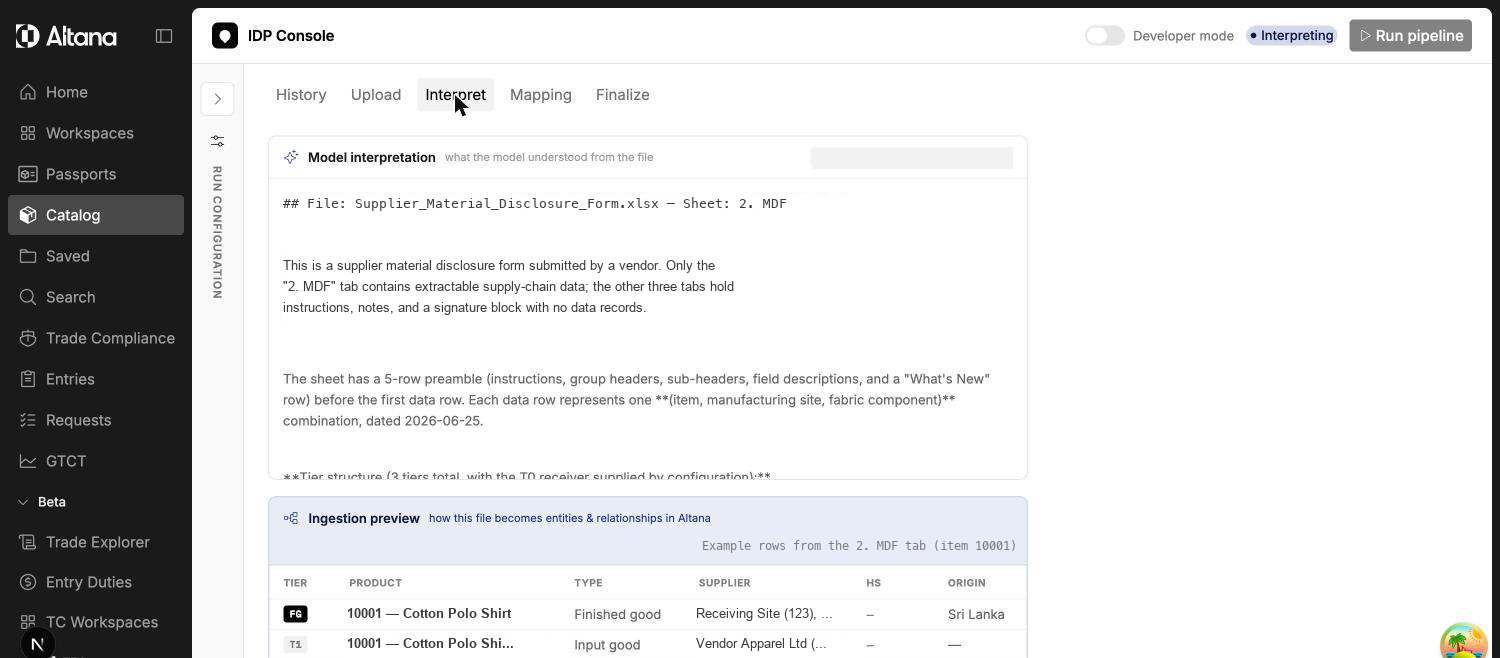
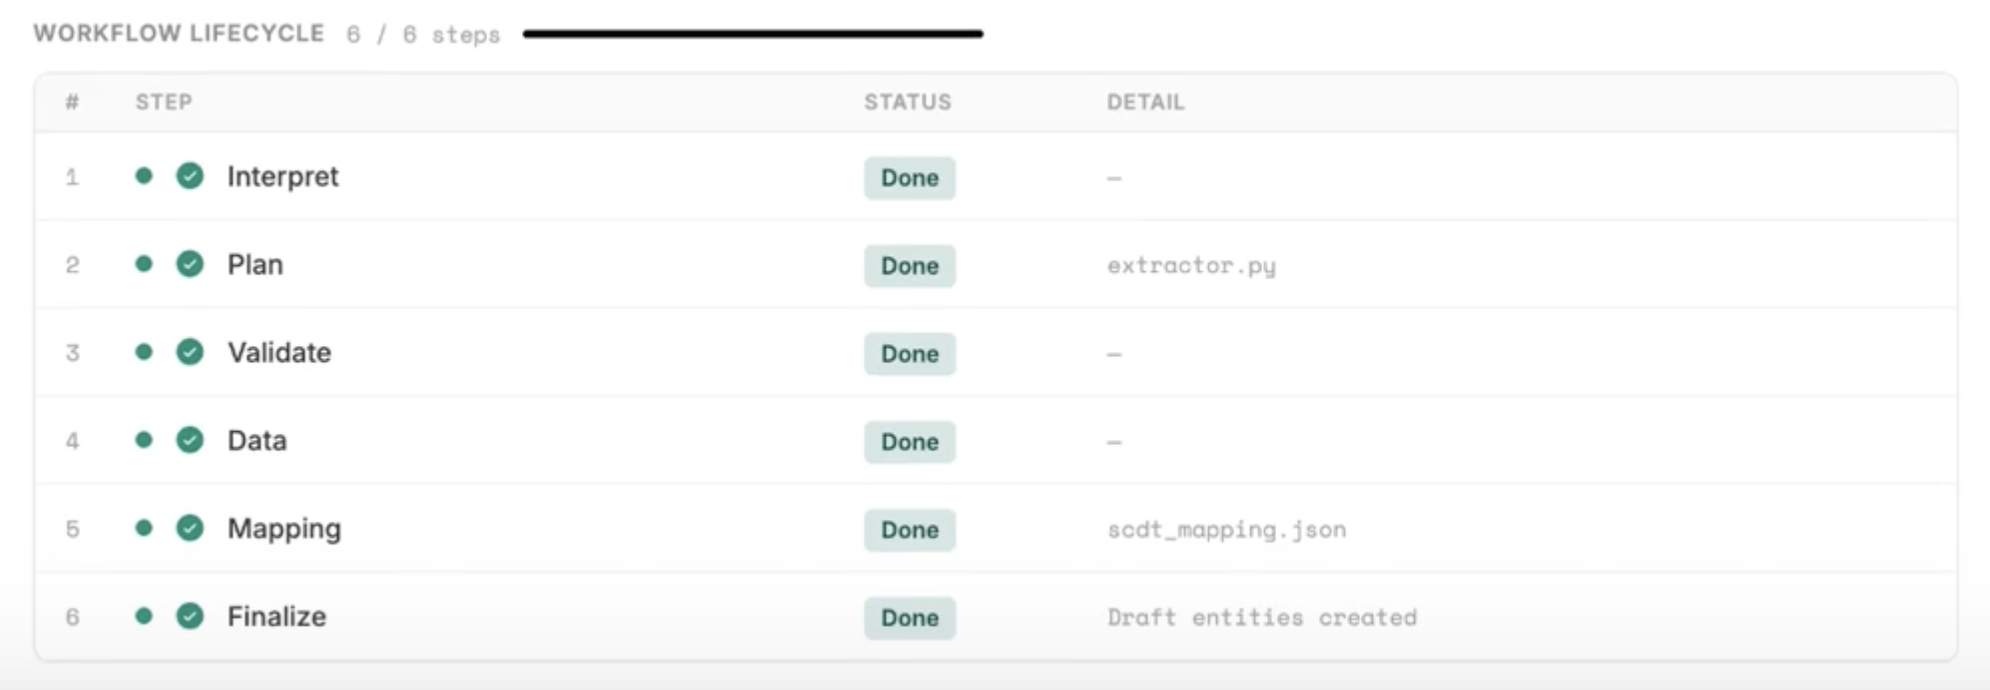
Select Run pipeline in the top right. Altana works through six stages — Interpret, Plan, Validate, Data, Mapping, and Finalize — and the Workflow lifecycle on the Upload tab tracks where your file has got to. Open the Interpret tab to watch it read your file.
Interpret gives you three things to check together:
- A plain-language narrative of what Altana understood from the file.
- An Ingestion preview table showing how rows will become tiered entities — finished good, input good, and sub-components — with their suppliers and origins.
- An Assumptions note: the assumptions the extractor will work under. If one of them is wrong, say so in the response box beneath it rather than letting the run proceed on it.
If the reading looks right, select Yes, looks right. If something is off, select No, something's off, describe what is wrong, and the interpreter re-reads the file. Each round is kept, so you can reopen an earlier one and see what changed.
8. Answer the open questions and approve
Once you confirm, Altana shows a short set of Open questions — modeling choices it wants you to decide, such as how to tell two supplier rows apart, or where to store a particular column. Each offers a few options, plus Other — write your own when none of them matches. Your answers are saved and shown back under Your answers, so you can see what the extractor was told.
Select Approve & continue when you are satisfied, or Ask another round to have the questions re-asked in light of your answers. After you approve, the rest of the pipeline runs on its own — there is nothing more to click. If an extraction attempt fails, Altana retries it and the lifecycle table marks the re-run, so a single failure does not cost you the batch.
9. Check the mapping and the entity counts
The Mapping tab shows how the columns in your file were mapped onto the Supply Chain Data Template fields — the same fields a template upload uses. It is the quickest way to see whether a column you care about landed where you expected.
Each field is tagged with where its mapping came from, so you can see what was remembered and what was guessed:
- from File Type — carried over from the mapping saved against this File Type.
- auto-mapped — Altana worked this one out from the file itself.
- overridden — someone changed it by hand.
When a mapping was seeded from a remembered format, a chip at the top reads Seeded from File Type name · vn. If that remembered mapping points at columns this file does not have, Mapping warns you rather than dropping them quietly — the warning names the sources that are unavailable for their fields, which usually means the format shifted since the last upload.
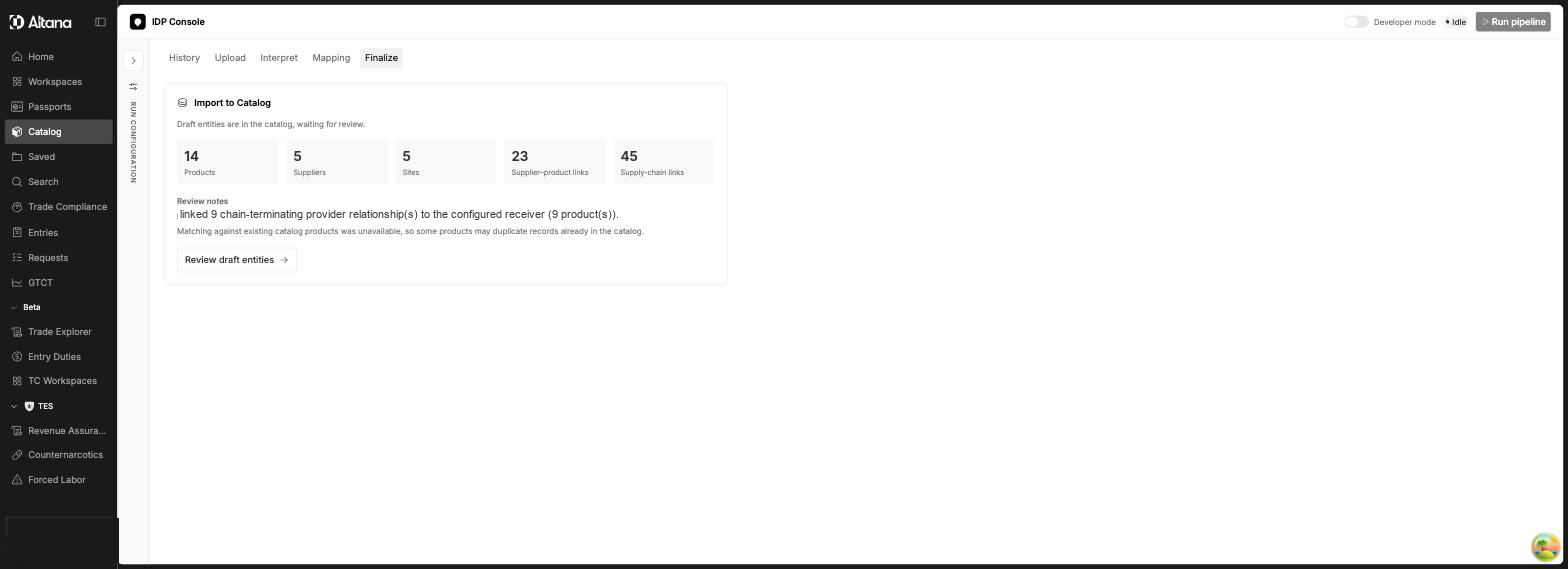
The Finalize tab resolves the mapped data into catalog entities and summarizes how many products, suppliers, sites, and relationship links came out, along with any warnings. Check that the counts look reasonable; a zero where you expected data is a sign to revisit the run.
From here the import runs by itself: Altana creates the entities as drafts and takes you to Review Extracted Data when they are ready. If it does not start on its own — or if it fails — the Finalize tab has Import to Catalog and Retry import buttons, and Review Drafts once the drafts exist.
10. Review the drafts and save them to your catalog
Review Extracted Data is where an upload becomes catalog data. You can reach it any time from View Imports on the catalog page, and View all drafts in catalog shows everything still waiting across your uploads.
Start with the Extraction Summary at the top. It counts the entities the run produced and splits them three ways — Net New, Updated, and Duplicates Detected — then tells you how many rows need review, with the same breakdown per products, suppliers, and sites. Read it before you touch the table: it is the fastest way to tell a clean run from one that matched almost nothing.
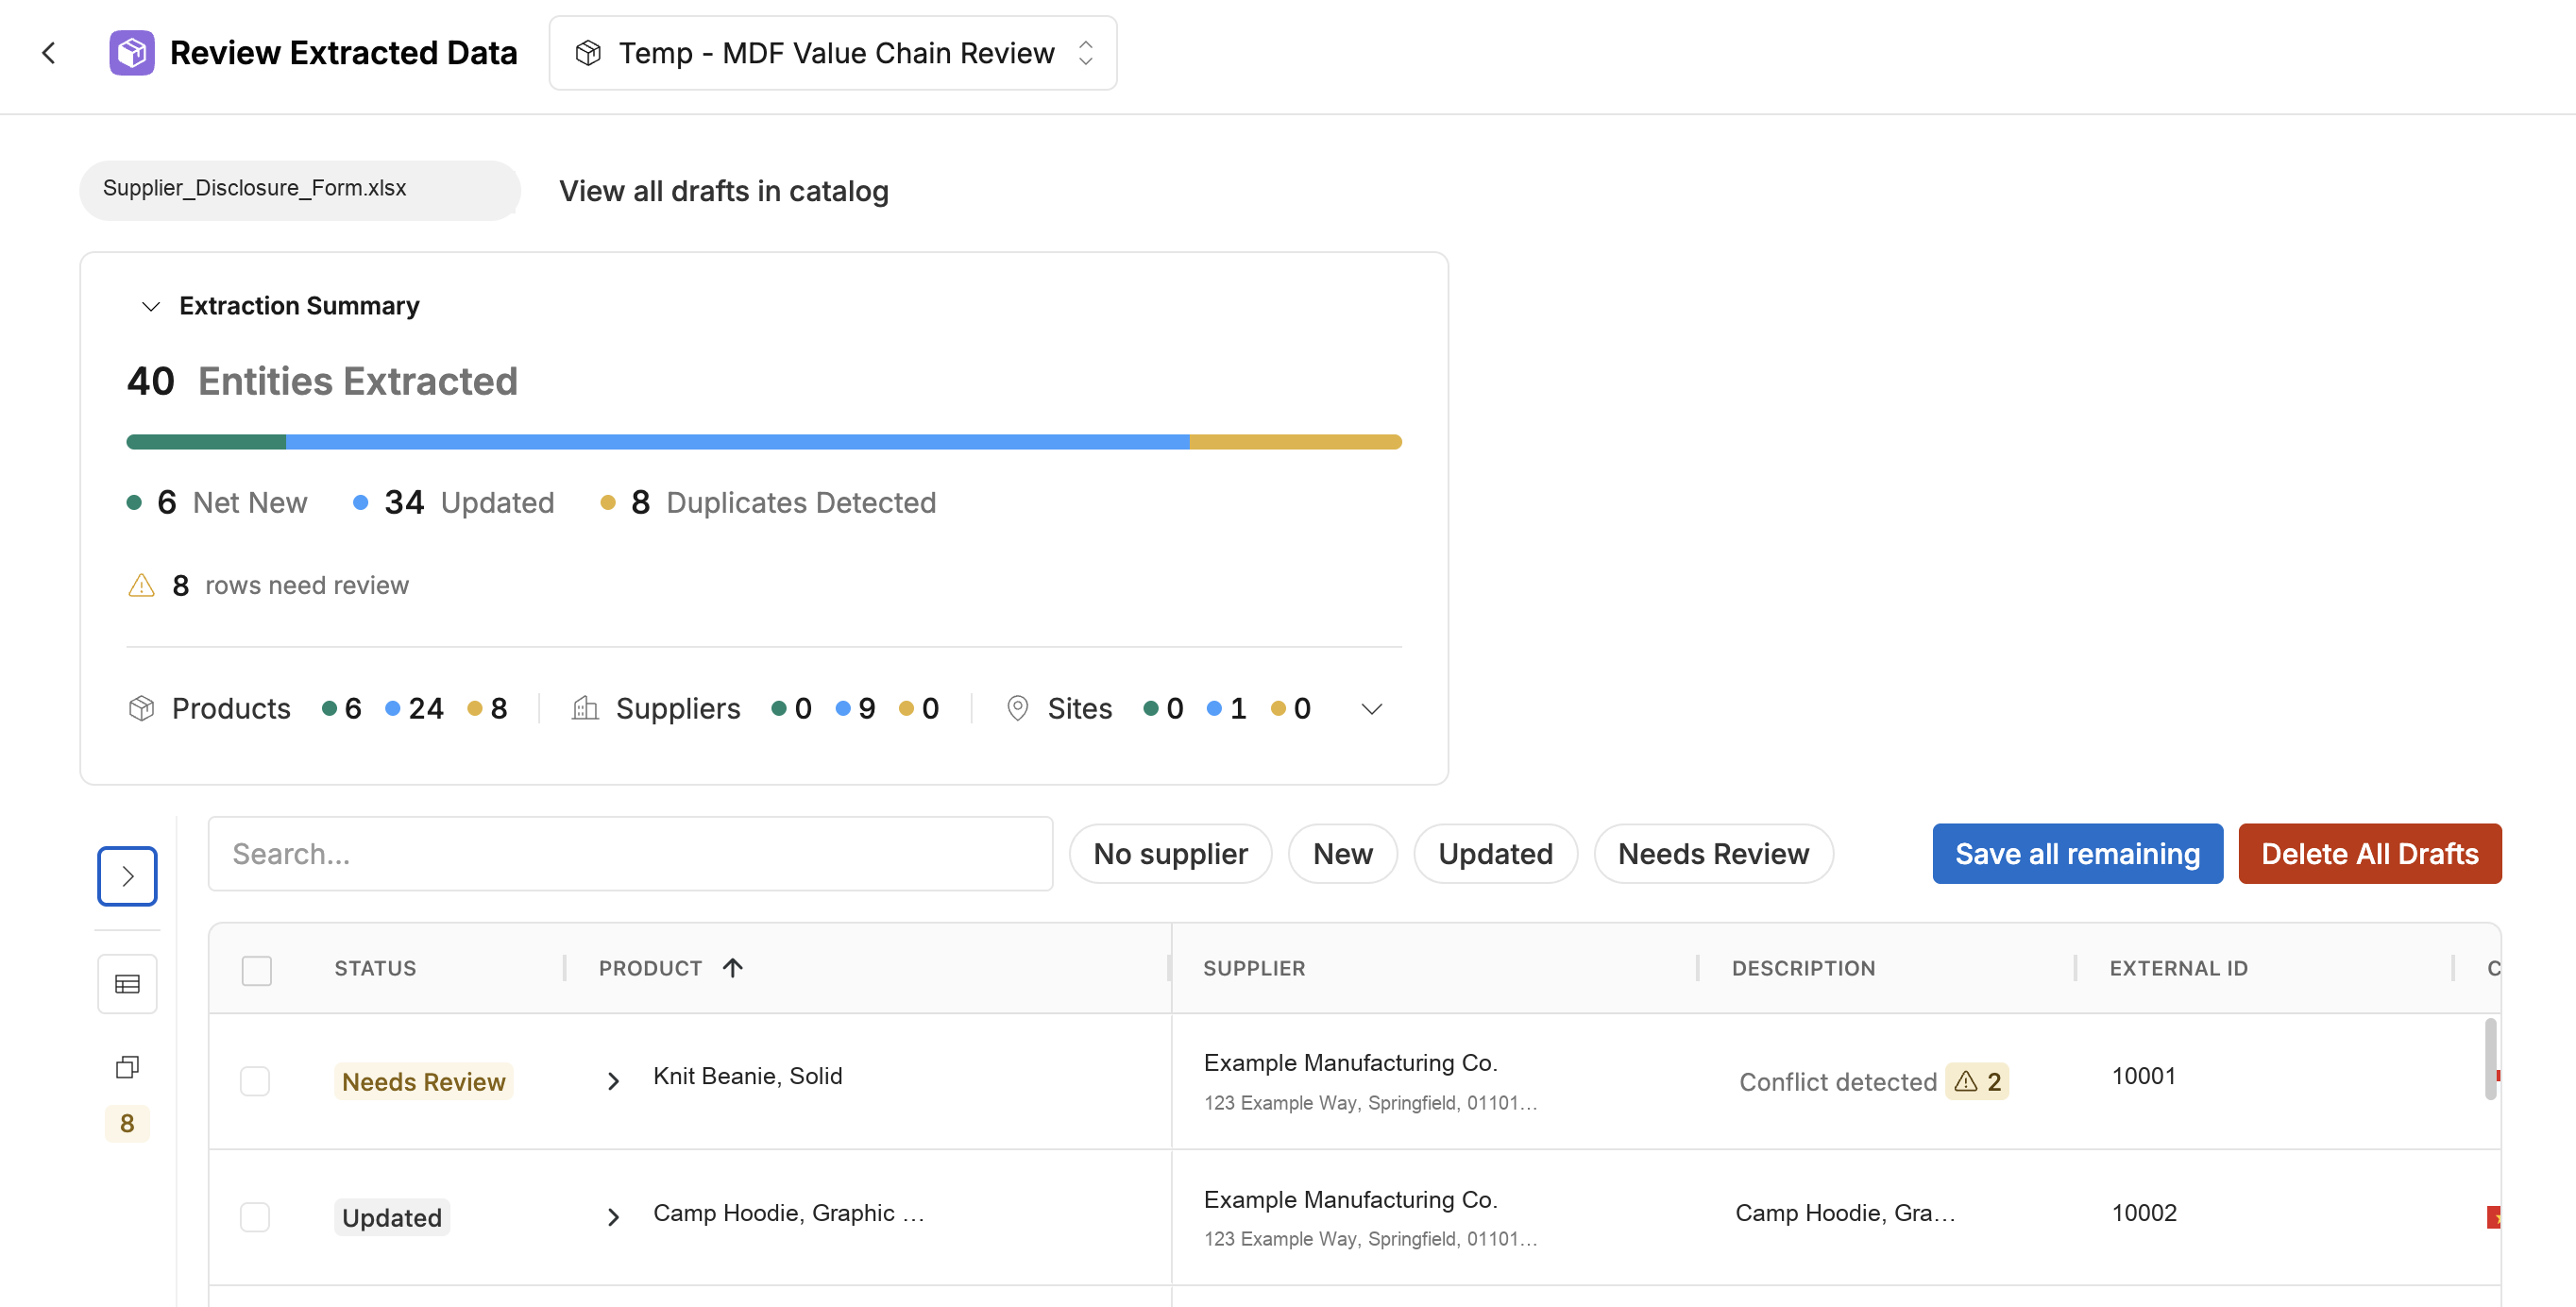
The filters — No supplier, New, Updated, Needs Review — narrow the table, and each row carries a status badge so you can see which is which while scrolling. Expanding a row shows the suppliers and components beneath a product.
Resolve the conflicts
A row marked Needs Review usually has a cell reading Conflict detected with a count: your file and your catalog disagree about a value. Select it and Altana lays out the candidates — 2 conflicting values — select one — labelling each with where it came from, the file name for the uploaded value and Existing catalog value for what you already have. Choose one with Select.
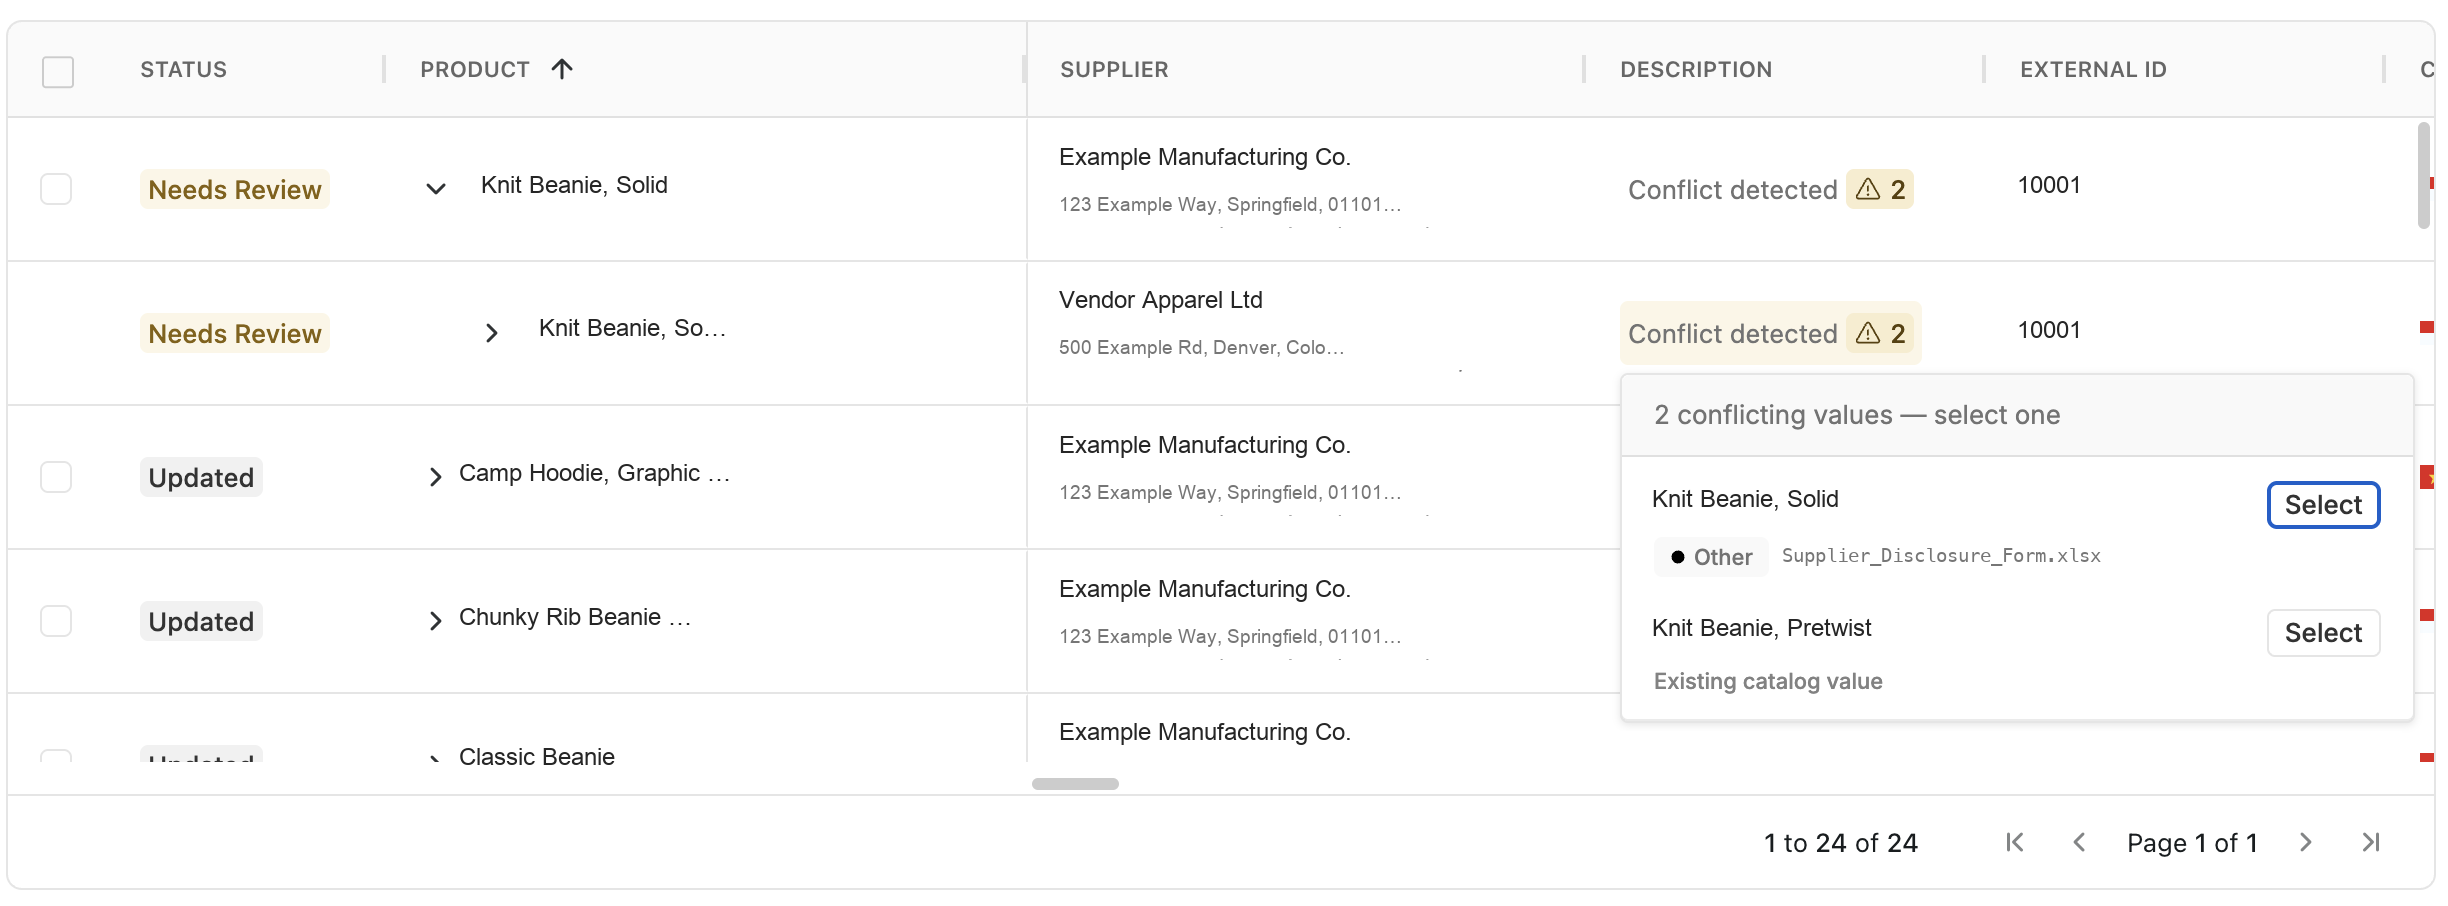
This is the part of the flow worth slowing down for. Altana will not guess between a value you uploaded and a value already in your catalog, and a row with unresolved conflicts cannot be saved until you decide. As you work through them the status badge becomes a counter — 2/2 when a row is fully resolved — so you can see the queue emptying.
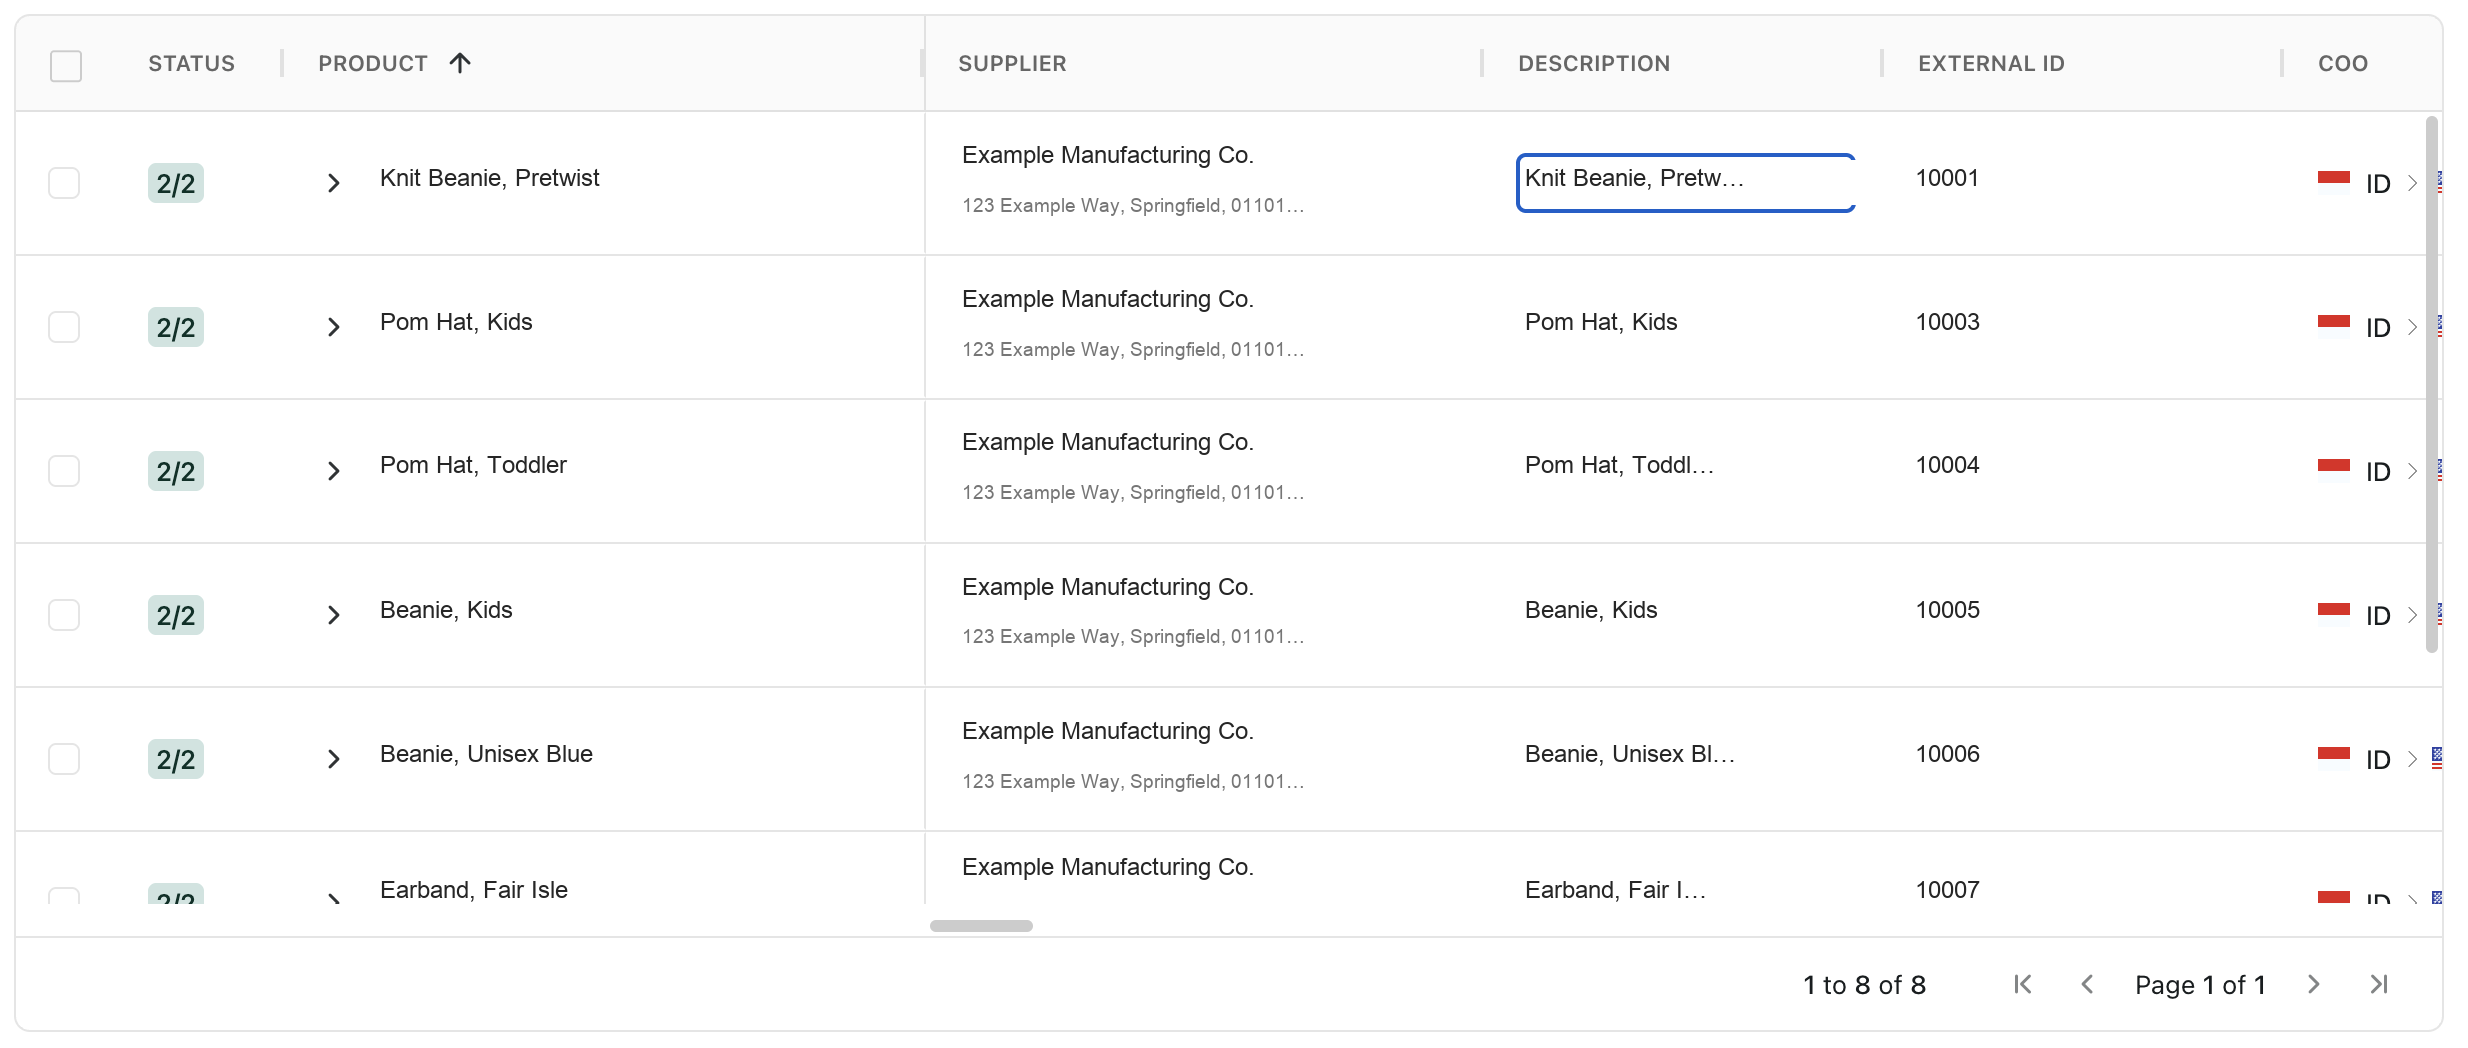
Draft fields are editable in the table too, so you can correct a name or fill a missing attribute here rather than re-uploading the file.
Save what you want
Select the rows you are happy with and choose Save Selected to promote those branches into the catalog, or use Save all remaining once the queue is clear. Delete Selected discards drafts you do not want and Delete All Drafts clears the batch if you would rather start over. Nothing is final until you save it, and drafts you neither save nor delete simply stay in the table.
Company names, file names, product names, addresses, and identifiers are replaced with example values in these screenshots.
How File Types remember a format
A File Type is Altana's memory of a format you upload more than once — a particular supplier's disclosure form, your own BOM export, a template a whole vendor base fills in. The first time one comes through, the work you do teaches it. From then on, a file of the same shape arrives with that work already applied.
A File Type carries two things:
- The context. The guidance written against that format — which tab holds the data, what identifies a product, what to ignore — pre-filled into the context box for you to check (step 5).
- The mapping. Which column feeds which Altana field, carried over as the starting point and tagged from File Type on the Mapping tab (step 9).
Mappings are versioned. The badge on the Upload tab names the File Type and its current mapping version, and its tooltip is explicit that this is the File Type's latest approved mapping — your upload may have run against an earlier one, which matters when you are comparing two runs of the same format.
What this means in practice: the second and later uploads of a format should take noticeably less of your attention than the first. What it does not mean is that you can skip the review. A remembered format is a stronger starting guess, not a guarantee — suppliers change their templates, and when they do, the drift warning on the Mapping tab is where you will see it.
What gets created
An upload produces the same kinds of records as a template upload: products, suppliers, sites, and the supply-chain relationships that connect each tier to the one below it. Once saved, everything downstream — value chains, trade workflows, risk screening — treats them identically to records loaded from the Supply Chain Data Template.
How your file is structured, which column means what, and how the tiers relate are all inferred from the file and the context you gave. The narrative, the assumptions note, the open questions, and the draft review table are there so you can catch a wrong reading before it becomes part of your catalog.
Constraints and caveats
- Spreadsheets only. A traceability packet that arrives as a PDF or a photo goes through Upload Documents instead; the two paths are separate today.
- Answers to the open questions belong to one batch, and so does the context note you edit. What carries across uploads is the File Type — its saved context and mapping — not the run itself, so expect to answer the structural questions again even for a format Altana recognizes.
- Altana Chat reads one file at a time. A batch holding several files does not get a recognized File Type or pre-filled context; write that batch's context yourself.
- The context note locks once interpretation starts. To change your guidance after that, flag the interpretation and describe the correction, or start a new batch.
- The questions are structural. They describe how to read the file as a whole and are not asked per product or per supplier, so a longer file does not mean proportionally more questions.
- Re-uploading a file you have already imported does not fail, but it produces duplicate groups you then have to work through in Resolve duplicates. Check History first.
- A product that comes back changed — a new season, a re-sourced supplier — is not versioned against the product you already have. If you need to tell those versions apart, plan for a custom field before you upload, and talk to your account team about what you want to compare.
Related
- Getting Data In — what data to bring, and what each addition unlocks.
- Uploading Products via CSV — the template-based upload path.
- How Catalog Uploads Work — how an upload matches, creates, and updates records.
- Value Chains — what happens to your data once it is in the catalog.